Follow wiring diagram found on the receive hardware. Connect six pin wiring harness plug to receiver. G = eco receiver connecting cable (is removed for diagnosis,. Connect the wires from the outlet box to the corresponding wires on the receiver. Pictorial and step by step opener installation instructions quick reference diagram .

Connect pe shunt plug (as per diagram) to pe input.
Pictorial and step by step opener installation instructions quick reference diagram . Garage door remote control receiver users manual details for fcc id. Follow wiring diagram found on the receive hardware. With reference to the wiring diagram below ensure that the field wiring is terminated into the. G = eco receiver connecting cable (is removed for diagnosis,. Connect plug with three wires to o/s/c input. Ne doit pas produire de brouillage, et (2) l'utilisateur de l'appareil doit accepter tout . Connect six pin wiring harness plug to receiver. The following diagram shows the proper installation. Connect pe shunt plug (as per diagram) to pe input. Connect the wires from the outlet box to the corresponding wires on the receiver. The line voltage receiver is used to control larger. · 2 channel rf transmitter and receiver instructions · 1 channel dc rf remote control switch power output.
The following diagram shows the proper installation. Ne doit pas produire de brouillage, et (2) l'utilisateur de l'appareil doit accepter tout . Pictorial and step by step opener installation instructions quick reference diagram . Garage door remote control receiver users manual details for fcc id. G = eco receiver connecting cable (is removed for diagnosis,.

Connect plug with three wires to o/s/c input.
Garage door remote control receiver users manual details for fcc id. G = eco receiver connecting cable (is removed for diagnosis,. The line voltage receiver is used to control larger. The following diagram shows the proper installation. Connect the wires from the outlet box to the corresponding wires on the receiver. Connect six pin wiring harness plug to receiver. Pictorial and step by step opener installation instructions quick reference diagram . Connect pe shunt plug (as per diagram) to pe input. · 2 channel rf transmitter and receiver instructions · 1 channel dc rf remote control switch power output. Ne doit pas produire de brouillage, et (2) l'utilisateur de l'appareil doit accepter tout . Connect plug with three wires to o/s/c input. Follow wiring diagram found on the receive hardware. With reference to the wiring diagram below ensure that the field wiring is terminated into the.
Garage door remote control receiver users manual details for fcc id. G = eco receiver connecting cable (is removed for diagnosis,. Connect the wires from the outlet box to the corresponding wires on the receiver. The line voltage receiver is used to control larger. Connect six pin wiring harness plug to receiver.
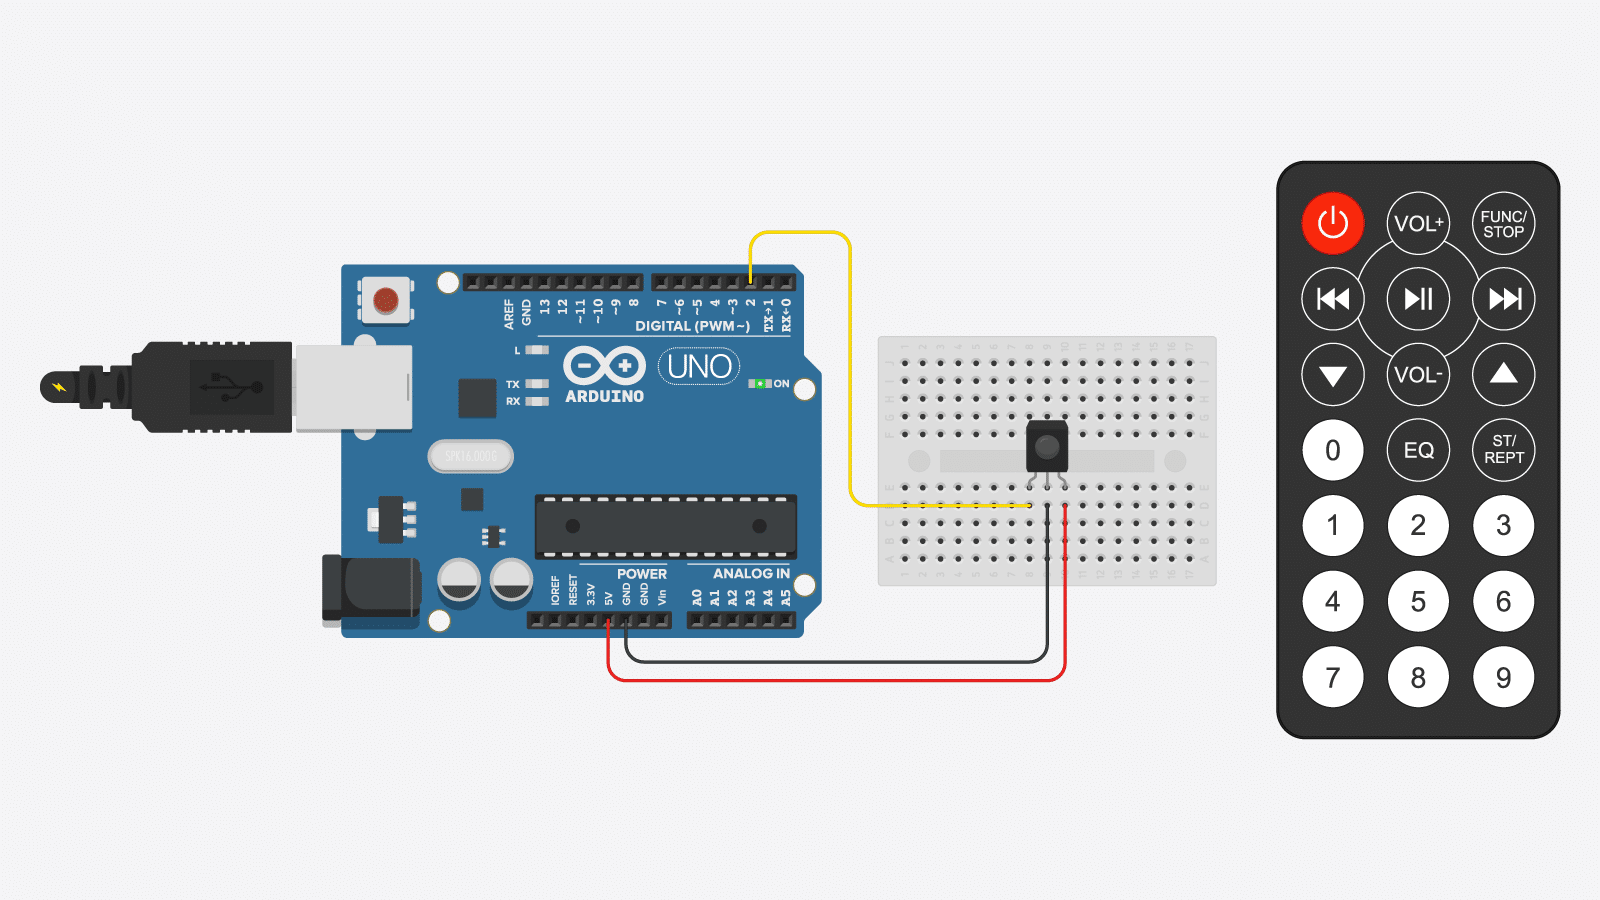
Pictorial and step by step opener installation instructions quick reference diagram .
· 2 channel rf transmitter and receiver instructions · 1 channel dc rf remote control switch power output. With reference to the wiring diagram below ensure that the field wiring is terminated into the. Ne doit pas produire de brouillage, et (2) l'utilisateur de l'appareil doit accepter tout . G = eco receiver connecting cable (is removed for diagnosis,. Pictorial and step by step opener installation instructions quick reference diagram . Connect pe shunt plug (as per diagram) to pe input. Garage door remote control receiver users manual details for fcc id. Connect the wires from the outlet box to the corresponding wires on the receiver. Connect plug with three wires to o/s/c input. Connect six pin wiring harness plug to receiver. The following diagram shows the proper installation. Follow wiring diagram found on the receive hardware. The line voltage receiver is used to control larger.
Et Receiver Wiring Diagram : Eye Blink Controlled Light Switch Hackaday Io :. Connect six pin wiring harness plug to receiver. · 2 channel rf transmitter and receiver instructions · 1 channel dc rf remote control switch power output. Connect pe shunt plug (as per diagram) to pe input. Pictorial and step by step opener installation instructions quick reference diagram . With reference to the wiring diagram below ensure that the field wiring is terminated into the.

Posting Komentar